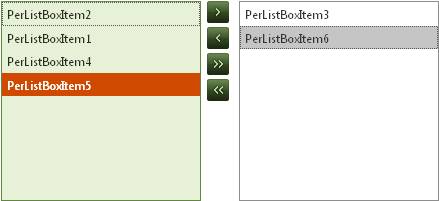
Information to ListBox Item Transferring Feature
In the real life application, we may need to transfer items from one listbox to another. In order to help developers achieve this function, the PerListBox Control specifically offer this item transferring feature.
In following content, coupled with detailed sample code, we will guide users how to transfer and exchange items between listboxes in ASP.NET web application. How to Use Item Transferring Feature in ListBox
In this part, we mainly guide you how to enable the item transferring feature in the PerListBox control. And to be first, we will briefly illustrate the functions of following three properties that will be used in the item transferring project.
AllowTransferDuplicates property: if you want to achieve item transferring by moving or copying one item from a listbox to another, you need to set this property to true. Important note: When setting the TransferMode to Move, the item will be moved from one listbox to another. If you set the TransferMode to Copy, the item will be copied into another listbox.
AllowTransferOnDoubleClick property: if you set this property to true, then you can transfer the item between listboxes by double clicking the item.
ShowTransferAll property: if you set this property to true, then the item transferring buttons will appear between two listboxes. If you set this property to false, then these buttons will be hidden.
AutoPostBackOnTransfer property: if you want to fire a postback on the item transfer action, you need to set this property to true.
The sample programming code listed below is used to demonstrate how to use above listbox properties for transferring items. PerListBoxSource.AutoPostBackOnTransfer = true;
The image below is a screen shot for the result of above ASP.NET item transferring application. 
Note: from above image, you will see that there are four transferring buttons placed between these two listboxes. The buttons with two angle brackets enables users to transfer all items from one listbox to another one. Other ListBox Related Features
Apart from the item transferring function, the PerListBox Control also offers other advanced item managing features, like
| 
ASP.NET AJAX UI Controls ASP.NET AJAX Chart UI Control ASP.NET AJAX Grid UI Control ASP.NET AJAX Barcode UI Control ASP.NET AJAX Button UI Control ASP.NET AJAX Calendar UI Control ASP.NET AJAX NavigationBar UI Control ASP.NET AJAX Captcha UI Control ASP.NET AJAX Color Editor UI Control ASP.NET AJAX ComboBox UI Control ASP.NET AJAX DataPager UI Control ASP.NET AJAX Dock UI Control ASP.NET AJAX DropDownList UI Control ASP.NET AJAX DropDownTree UI Control ASP.NET AJAX HtmlEditor UI Control ASP.NET AJAX FileManager UI Control ASP.NET AJAX Filter UI Control ASP.NET AJAX Input UI Control ASP.NET AJAX ListBox UI Control OverviewGetting StartedElementsFeatures ReorderTransfer Drag and DropButton ConfigurationCheckBoxesLoad On DemandTemplatesData Binding XML DataDataSource DataClient Prpgramming ListBox EventServer Prpgramming ListBox EventASP.NET AJAX ListView UI Control ASP.NET AJAX ToolBar UI Control ASP.NET AJAX TabControl UI Control ASP.NET AJAX Menu UI Control ASP.NET AJAX ToolTip UI Control |